Difference between revisions of "A Layman's Guide - How to Compile ReactOS"
m (→Compiling the source (64 bit)) |
Binarymaster (talk | contribs) |
||
| (17 intermediate revisions by 2 users not shown) | |||
| Line 1: | Line 1: | ||
| − | This guide shows you how to make your own working environment, down load the ReactOS source code and then compile it using the '''R'''eact'''os B'''uild''' E'''vironment. | + | {{Laymans}} |
| + | This guide shows you how to make your own working environment, down load the ReactOS source code and then compile it using the '''R'''eact'''os B'''uild''' E'''vironment. Section one covers Windows and section two covers Unix and section three applies to either. | ||
| + | |||
| + | ==Section one - Windows== | ||
| + | |||
===Setting up a local working environment=== | ===Setting up a local working environment=== | ||
| Line 5: | Line 9: | ||
You will need to install '''git''' for Windows from '''https://git-for-windows.github.io/''' and '''TortoiseGit''' from '''https://tortoisegit.org/'''. | You will need to install '''git''' for Windows from '''https://git-for-windows.github.io/''' and '''TortoiseGit''' from '''https://tortoisegit.org/'''. | ||
| − | Next you will need to create a master folder to keep all the next folders in one place. This folder can be created in C: or D: (or any other drive partition), | + | Next you will need to create a master folder to keep all the next folders in one place. This folder can be created in C: or D: (or any other drive partition and name it whatever you want), example '''D:\ReactOS_Development''' or '''C:\ROS'''. |
Create the following folders in your master folder: | Create the following folders in your master folder: | ||
| Line 35: | Line 39: | ||
'''D:\ReactOS_Development\RosBE''' | '''D:\ReactOS_Development\RosBE''' | ||
| − | Using example No2, within '''D:\ReactOS_Development\''' | + | Using example No2, within '''D:\ReactOS_Development\''' you will have created a '''Compiled''' folder, a '''RosBE''' folder and a '''Source''' folder. |
Next, navigate into '''D:\ReactOS_Development\Source''' and right click within the folder, then select '''Git Clone''', then in the next window, enter this url '''<nowiki>https://github.com/reactos/reactos.git</nowiki>'''; this will create a '''reactos''' folder and download the current source tree into it. | Next, navigate into '''D:\ReactOS_Development\Source''' and right click within the folder, then select '''Git Clone''', then in the next window, enter this url '''<nowiki>https://github.com/reactos/reactos.git</nowiki>'''; this will create a '''reactos''' folder and download the current source tree into it. | ||
| Line 46: | Line 50: | ||
(a link to the latest version <small>(''Windows and Unix'')</small> can be found here: '''https://www.reactos.org/wiki/ReactOS_Build_Environment''') into '''D:\ReactOS_Development\RosBE'''. | (a link to the latest version <small>(''Windows and Unix'')</small> can be found here: '''https://www.reactos.org/wiki/ReactOS_Build_Environment''') into '''D:\ReactOS_Development\RosBE'''. | ||
| − | '''Note''': if want to have a script | + | If you have '''git''', '''TortoiseGit''', '''RosBE''' installed, and ReactOS master cloned into your source directory, you are ready to start the compilation process. |
| + | |||
| + | '''Note''': if want to have a script to automate most of the above work for you, then there is a '''[[User:Oldman/A_layman%27s_guide/Miscellaneous#Windows_-_Create_the_Tutorial_working_environment|script here]]''' to do just that. <!-- This link will need to be updated if anything changes in the page linked to, if it stops working --> | ||
===Compiling the source (32 bit)=== | ===Compiling the source (32 bit)=== | ||
| Line 72: | Line 78: | ||
If you have problems compiling after you have updated your local source tree, try typing '''ninja clean''' and then start again at step '''1''' above. | If you have problems compiling after you have updated your local source tree, try typing '''ninja clean''' and then start again at step '''1''' above. | ||
| + | |||
| + | |||
| + | If you are doing something different to the suggested example above and have not created a separate directory for the compiled source, then when using RosBE, you are in the '''reactos''' directory and type '''configure ninja''' or '''configure make''', you will find that RosBE has created a new directory in the reactos directory, called '''output-MinGW-i386'''. You must change directories into this '''output-MinGW-i386''' directory to issue the commands '''ninja livecd''' or '''ninja bootcd''' (make bootcd or make livecd). The created ISO will then be in the '''output-MinGW-i386''' directory. | ||
| + | |||
| + | |||
| + | <div style="padding:0em 0.5em 0.5em 0.5em;border:2px solid #dd0000;"> | ||
| + | What ever directory structure you have created, you will need to be in the directory that RosBE declares after it has run the command '''configure ninja''' or '''configure make''' from within the '''reactos''' directory. | ||
| + | |||
| + | This is one example (below) from RosBE output, where I have underlined the path in white. Whatever the path that is shown there, is the directory that you should be in, to build and make the ISO of your choice. | ||
| + | <div style="background:#000;color:#0d0;"> | ||
| + | -- Generating done<br> | ||
| + | -- Build files have been written to: <span style="border-bottom:2px solid #fff;padding:0px">E:/ReactOS_Development/Compiled</span> | ||
| + | |||
| + | Configure script complete! Execute appropriate build commands (ex: ninja, make, nmake, etc...) | ||
| + | </div></div> | ||
===Compiling the source (64 bit)=== | ===Compiling the source (64 bit)=== | ||
'''Note''': | '''Note''': | ||
| − | * These instructions are only applicable to '''RosBE 2.2.0''' | + | * These instructions are only applicable to '''RosBE 2.2.0''' and above. |
* They do not work with the earlier '''RosBE 2.1.6'''. | * They do not work with the earlier '''RosBE 2.1.6'''. | ||
| − | * '''64 bit gcc is not currently supported'''. | + | * '''64 bit gcc is not currently supported''' (this may change soon). |
* '''RosBE''' needs to be configured to use '''msvc''' to compile a '''64 bit''' version of '''ReactOS'''. | * '''RosBE''' needs to be configured to use '''msvc''' to compile a '''64 bit''' version of '''ReactOS'''. | ||
| Line 90: | Line 111: | ||
===Screenshots=== | ===Screenshots=== | ||
| − | |||
====Getting the source with Git==== | ====Getting the source with Git==== | ||
<gallery widths="429px" heights="545px" paddings="0px"> | <gallery widths="429px" heights="545px" paddings="0px"> | ||
| Line 112: | Line 132: | ||
====Updating a local source tree with Git==== | ====Updating a local source tree with Git==== | ||
| − | <gallery | + | |
| − | File:Git-pull-1.png| Right click on your source folder, then select '''TortoiseGit''', then '''Pull...''' | + | <gallery mode="slideshow"> |
| − | File:Git-Pull-2.png| If this window has the same settings as in the above, then leave it as it is and click '''OK''' | + | File:Git-pull-1.png|frame|Right click on your source folder, then select '''TortoiseGit''', then '''Pull...''' |
| − | + | ||
| − | + | File:Fetch.png|frame|Fetch | |
| − | File:Git-pull-3.png| This shows a completed update of the source folder from reactos.git | + | |
| + | File:rebase.png|frame|Rebase | ||
| + | |||
| + | File:Git-Pull-2.png|frame|If this window has the same settings as in the above, then leave it as it is and click '''OK''' | ||
| + | |||
| + | File:Git-pull-3.png|frame|This shows a completed update of the source folder from reactos.git | ||
</gallery> | </gallery> | ||
| Line 132: | Line 157: | ||
File:rosbe-3.png|[<span style="color:#0000ff">'''7'''</span>] Choosing a Desktop icon. | File:rosbe-3.png|[<span style="color:#0000ff">'''7'''</span>] Choosing a Desktop icon. | ||
</gallery> | </gallery> | ||
| + | '''Note''': If you select AMD64 compiler and Desktop shortcuts, you will have two RosBE shortcuts on the desktop, one for the 32 bit compiler and one for the AMD64 compiler. | ||
====Compiling with RosBE==== | ====Compiling with RosBE==== | ||
| Line 138: | Line 164: | ||
File:RosBEcompiling.png|[<span style="color:#0000ff">'''8'''</span>] RosBE in action. | File:RosBEcompiling.png|[<span style="color:#0000ff">'''8'''</span>] RosBE in action. | ||
</gallery> | </gallery> | ||
| − | In the screenshot of RosBE, you can see that the working directory | + | In the screenshot of RosBE, you can see that the working directory has been changed from '''source''' to '''compiled''', then '''configure ninja''' has been executed and completed. The command line now shows '''ninja bootcd''' waiting to be executed. |
| + | |||
| + | Note: RosBE 2.2.0 amd64 displays with blue text and the for 32 bit compile mode, with green text, as above. | ||
====Changing modes in RosBE==== | ====Changing modes in RosBE==== | ||
| Line 144: | Line 172: | ||
File:Rosbe-2.2.0.png | File:Rosbe-2.2.0.png | ||
</gallery> | </gallery> | ||
| + | Note: If you change from 32 bit compile mode to amd64, it will still have green text. | ||
| − | == | + | ==Section two - Unix== |
| − | + | <!-- ===<span style="color:#0000ff">How to compile ReactOS - '''Unix subsection'''</span>=== --> | |
| − | |||
| − | |||
| − | |||
| − | |||
| − | |||
| − | |||
| − | |||
| − | |||
| − | |||
| − | |||
| − | |||
| − | |||
| − | |||
| − | |||
| − | |||
| − | |||
| − | |||
| − | |||
| − | |||
| − | |||
| − | |||
| − | |||
| − | |||
| − | |||
| − | |||
| − | |||
| − | |||
| − | |||
| − | |||
| − | |||
| − | |||
| − | |||
| − | |||
| − | |||
| − | |||
| − | ===<span style="color:#0000ff">How to compile ReactOS - '''Unix subsection'''</span>=== | ||
The ReactOS Build Environment requires the following software to be installed on Unix systems: | The ReactOS Build Environment requires the following software to be installed on Unix systems: | ||
| Line 198: | Line 191: | ||
* '''zlib''' | * '''zlib''' | ||
| − | There is a script in the unix section of '''[[User:Oldman/A layman's guide/Miscellaneous#Software_checker- | + | There is a script in the unix section of '''[[User:Oldman/A layman's guide/Miscellaneous#Software_checker-installer for RosBE |Miscellaneous]]''', which can automate the checking for and the installation of the above software. |
===Setting up a local working environment=== | ===Setting up a local working environment=== | ||
| − | You will now need to download the ReactOS Build Environment (RosBE), from '''https://www.reactos.org/wiki/ReactOS_Build_Environment''' | + | You will now need to download the current ReactOS Build Environment (RosBE), from '''https://www.reactos.org/wiki/ReactOS_Build_Environment''' |
'''Example:''' | '''Example:''' | ||
| − | Unpack the RosBE installation files to '''/home/RosBE-Unix- | + | Unpack the RosBE installation files to '''/home/RosBE-Unix-*.*.*''' directory.<br>(*.*.* = version number, currently 2.2.1) |
Create the following folders '''/home/RosBuild''' then '''/home/RosBuild/RosBE''' (install RosBE in this folder). | Create the following folders '''/home/RosBuild''' then '''/home/RosBuild/RosBE''' (install RosBE in this folder). | ||
| Line 212: | Line 205: | ||
'''Note:''' The default directory for RosBE, is '''/usr/local/RosBE''', if you prefer, you can use that. | '''Note:''' The default directory for RosBE, is '''/usr/local/RosBE''', if you prefer, you can use that. | ||
| − | To continue with my example; Open the folder '''/home/RosBE-Unix- | + | To continue with my example; Open the folder '''/home/RosBE-Unix-*.*.*''' and right click within <sup>[<span style="color:#0000ff">'''9'''</span>]</sup>, for the menu, '''Window''' - '''Terminal Here''' <sup>[<span style="color:#0000ff">'''10'''</span>]</sup>. |
In the terminal window, run the builder script by typing '''./RosBE-Builder.sh'''. If it reports any missing tools <sup>[<span style="color:#0000ff">'''11'''</span>]</sup>, you will need to install them (see list above). | In the terminal window, run the builder script by typing '''./RosBE-Builder.sh'''. If it reports any missing tools <sup>[<span style="color:#0000ff">'''11'''</span>]</sup>, you will need to install them (see list above). | ||
| Line 226: | Line 219: | ||
To populate your source folder, you will need to open a terminal window within the empty source folder; right click - '''Window''' - '''Terminal Here''', then at the command prompt, type: | To populate your source folder, you will need to open a terminal window within the empty source folder; right click - '''Window''' - '''Terminal Here''', then at the command prompt, type: | ||
| − | '''git clone <nowiki>https://github.com/reactos/reactos.git</nowiki>'''. | + | <span style="font:large normal monospace">'''git clone <nowiki>https://github.com/reactos/reactos.git</nowiki>'''</span>. |
This will create a folder called '''reactos''' and download the main source code. | This will create a folder called '''reactos''' and download the main source code. | ||
| Line 236: | Line 229: | ||
To update the source code, right click within the reactos folder and select '''Window''' - '''Terminal Here''', then at the command prompt type: | To update the source code, right click within the reactos folder and select '''Window''' - '''Terminal Here''', then at the command prompt type: | ||
| − | '''git pull <nowiki>https://github.com/reactos/reactos.git</nowiki>''' | + | <span style="font:large normal monospace">'''git pull <nowiki>https://github.com/reactos/reactos.git</nowiki>'''</span> |
'''NOTE''': You must be '''actually in''' the '''source''' folder to clone and '''actually in''' the '''reactos''' folder to update the source or get the revision number. | '''NOTE''': You must be '''actually in''' the '''source''' folder to clone and '''actually in''' the '''reactos''' folder to update the source or get the revision number. | ||
There is also a script in the '''[[User:Oldman/A layman's guide/Miscellaneous#Create the Tutorial working environment|Miscellaneous]]''' unix section, that can automate the setting up of a working environment. | There is also a script in the '''[[User:Oldman/A layman's guide/Miscellaneous#Create the Tutorial working environment|Miscellaneous]]''' unix section, that can automate the setting up of a working environment. | ||
| − | <!-- | + | <!-- --> |
===Compiling the source=== | ===Compiling the source=== | ||
| Line 252: | Line 245: | ||
and then '''ninja livecd''' or '''ninja bootcd''' | and then '''ninja livecd''' or '''ninja bootcd''' | ||
| + | |||
| + | |||
| + | If you are doing something different to the suggested example above and have not created a separate directory for the compiled source, then when using RosBE, you are in the '''reactos''' directory and type '''configure.sh''', you will find that RosBE has created a new directory in the reactos directory, called '''output-MinGW-i386'''. You must change directories into this '''output-MinGW-i386''' directory to issue the commands '''ninja livecd''' or '''ninja bootcd''' ('''make''' does not work in Unix RosBE). The created ISO will then be in the '''output-MinGW-i386''' directory. | ||
| + | |||
| + | |||
| + | <div style="padding:0em 0.5em 0.5em 0.5em;border:2px solid #dd0000;"> | ||
| + | What ever directory structure you have created, you will need to be in the directory that RosBE declares after it has run the command '''configure.sh''' from within the '''reactos''' directory. | ||
| + | |||
| + | This is one example (below) from RosBE output, where I have underlined the path in green. Whatever the path that is shown there, is the directory that you should be in, to build and make the ISO of your choice. | ||
| + | <div style="background:#000;color:#fff"> | ||
| + | -- Configuring done<br> | ||
| + | -- Generating done<br> | ||
| + | -- Build files have been written to: <span style="border-bottom:2px solid #00aa00;padding:0px">/home/oldman/ROSBuild/Compiled32</span> | ||
| + | |||
| + | Configure script complete! Execute appropriate build commands (ex: ninja, make, nmake, etc...). | ||
| + | </div></div> | ||
| + | |||
====Screenshots==== | ====Screenshots==== | ||
| Line 268: | Line 278: | ||
File:RosBE-Builder-2.png|[<span style="color:#0000ff">'''12'''</span>] RosBE installation script (RosBE-Builder.sh) running in a terminal window, showing dependencies all found. | File:RosBE-Builder-2.png|[<span style="color:#0000ff">'''12'''</span>] RosBE installation script (RosBE-Builder.sh) running in a terminal window, showing dependencies all found. | ||
</gallery> | </gallery> | ||
| + | |||
| + | ==Section three - General== | ||
| + | |||
| + | ===Getting the source of a single branch=== | ||
| + | You may decide you want to download the source of one of the branches, so this is how to do it from the command prompt using the directory structure from the previous examples. | ||
| + | |||
| + | In a terminal widow, navigate to your local source directory and type the following: | ||
| + | |||
| + | <span style="font:large normal monospace">'''git clone --single-branch --branch releases/0.4.13 <nowiki>https://github.com/reactos/reactos.git</nowiki> 0.4.13'''<span> | ||
| + | |||
| + | Replace '''releases/0.4.13''' with the branch of your choice. | ||
| + | |||
| + | Explanation: | ||
| + | |||
| + | '''git''' ..................................................................... Starts git. | ||
| + | |||
| + | '''clone''' ............................................................... The command that tells git to clone the Repository. | ||
| + | |||
| + | '''--single-branch''' .............................................. This tells git to only clone a single branch. | ||
| + | |||
| + | '''--branch''' .......................................................... The switch for a branch. | ||
| + | |||
| + | '''releases/0.4.13''' .............................................. The branch path and name. | ||
| + | |||
| + | '''<nowiki>https://github.com/reactos/reactos.git</nowiki>''' ....... The URL of the Reactos git repository. | ||
| + | |||
| + | '''0.4.13''' ............................................................... The folder to clone into. | ||
| + | |||
| + | If you omit to put a folder name after the URL, it will use the default from github, which will be reactos. You could use any name you choose, as in the following example, where '''mybranch''' is used; if the folder does not exist, then it will be created. | ||
| + | |||
| + | <span style="font:large bold monospace">git clone --single-branch --branch releases/0.4.13 <nowiki>https://github.com/reactos/reactos.git</nowiki> '''mybranch'''</span> | ||
| + | |||
| + | |||
| + | =====Selecting a branch===== | ||
| + | <gallery widths="882px" heights="497px" paddings="0px"> | ||
| + | File:Reactos.git.png | ||
| + | </gallery> | ||
| + | In your browser, go to https://github.com/reactos/reactos, which will display the page shown in the image above. | ||
| + | |||
| + | To select a branch, click on the down arrow (as shown in the above image), then choose a branch from the drop-down list; you may need to scroll down the list. | ||
| + | |||
| + | ===Getting the source of a repository=== | ||
| + | |||
| + | |||
| + | If you want to clone a repository from '''https://github.com/reactos''' | ||
| + | such as '''rapps-db''' for example, then add the repository name to the end of the url, like so: | ||
| + | |||
| + | '''git clone <nowiki>https://github.com/reactos/rapps-db</nowiki>''' | ||
| + | |||
| + | or '''developer-web-interface''', then it would look like this: | ||
| + | |||
| + | '''git clone <nowiki>https://github.com/reactos/developer-web-interface</nowiki>''' | ||
| + | |||
| + | Using the example of rapps-db, if you wanted to clone it into another directory other than rapps-db, then you would leave a space at the end of the url and then type the chosen name for the directory, like so: | ||
| + | |||
| + | '''git clone <nowiki>https://github.com/reactos/rapps-db</nowiki> software_database''' | ||
| + | (software_database is only a suggestion, use your own name). | ||
| Line 273: | Line 340: | ||
[[User:Oldman/A_layman's_guide | Layman's guides]] | [[User:Oldman/A_layman's_guide | Layman's guides]] | ||
| + | |||
| + | |||
| + | See also: | ||
| + | |||
| + | [[Building ReactOS]] | ||
Latest revision as of 12:27, 28 June 2022
| A Layman's Guide |
|---|
|
By Oldman
|
This guide shows you how to make your own working environment, down load the ReactOS source code and then compile it using the Reactos Build Evironment. Section one covers Windows and section two covers Unix and section three applies to either.
Contents
Section one - Windows
Setting up a local working environment
You will need to install git for Windows from https://git-for-windows.github.io/ and TortoiseGit from https://tortoisegit.org/.
Next you will need to create a master folder to keep all the next folders in one place. This folder can be created in C: or D: (or any other drive partition and name it whatever you want), example D:\ReactOS_Development or C:\ROS.
Create the following folders in your master folder:
1. \source (the name does not matter - you will download the source tree into this folder).
2. \compiled (the name does not matter - this is the output folder where the binaries are complied to and the ISO is created).
3. \RosBE (this is where you will install RosBE).
You should now have something like the following examples.
Example No1
C:\ROS\source
C:\ROS\compiled
C:\ROS\RosBE
or
Example No2
D:\ReactOS_Development\Source
D:\ReactOS_Development\Compiled
D:\ReactOS_Development\RosBE
Using example No2, within D:\ReactOS_Development\ you will have created a Compiled folder, a RosBE folder and a Source folder. Next, navigate into D:\ReactOS_Development\Source and right click within the folder, then select Git Clone, then in the next window, enter this url https://github.com/reactos/reactos.git; this will create a reactos folder and download the current source tree into it.
I have noticed this behaviour with Git; if you first copy the url, then click in the source folder, you will find that Git has put the copied url in the Url input and put the path to your source folder with the addition of reactos, in the Directory input. See [1] [2] [3a] [3b] [4] in the Getting the source with Git section below.
For how to update your local source, see the subsection Updating a local source tree with Git.
Having downloaded the source you will now need to download and install the ReactOS Build Environment [5] [6] [7] (a link to the latest version (Windows and Unix) can be found here: https://www.reactos.org/wiki/ReactOS_Build_Environment) into D:\ReactOS_Development\RosBE.
If you have git, TortoiseGit, RosBE installed, and ReactOS master cloned into your source directory, you are ready to start the compilation process.
Note: if want to have a script to automate most of the above work for you, then there is a script here to do just that.
Compiling the source (32 bit)
To continue with my example; start RosBE, and from it's command prompt: [8] (Note: If you did not install RosBE with the desktop shortcut option selected, then open a command prompt window and navigate to D:\ReactOS_Development\RosBE and type RosBE to start it.) and within RosBE,
1. Navigate to D:\ReactOS_Development\Compiled and type D:\ReactOS_Development\Source\reactos\configure ninja
2. Still within D:\ReactOS_Development\Compiled type ninja bootcd
or
3. Still within D:\ReactOS_Development\Compiled type ninja livecd
or
4. Still within D:\ReactOS_Development\Compiled type ninja hybridcd
or if want all three ISO images
5. Still within D:\ReactOS_Development\Compiled type ninja bootcd livecd hybridcd
Now you should find the bootcd and/or the livecd and/or hybridcd in D:\ReactOS_Development\Compiled\reactos.
If you have problems compiling after you have updated your local source tree, try typing ninja clean and then start again at step 1 above.
If you are doing something different to the suggested example above and have not created a separate directory for the compiled source, then when using RosBE, you are in the reactos directory and type configure ninja or configure make, you will find that RosBE has created a new directory in the reactos directory, called output-MinGW-i386. You must change directories into this output-MinGW-i386 directory to issue the commands ninja livecd or ninja bootcd (make bootcd or make livecd). The created ISO will then be in the output-MinGW-i386 directory.
What ever directory structure you have created, you will need to be in the directory that RosBE declares after it has run the command configure ninja or configure make from within the reactos directory.
This is one example (below) from RosBE output, where I have underlined the path in white. Whatever the path that is shown there, is the directory that you should be in, to build and make the ISO of your choice.
-- Generating done
-- Build files have been written to: E:/ReactOS_Development/Compiled
Configure script complete! Execute appropriate build commands (ex: ninja, make, nmake, etc...)
Compiling the source (64 bit)
Note:
- These instructions are only applicable to RosBE 2.2.0 and above.
- They do not work with the earlier RosBE 2.1.6.
- 64 bit gcc is not currently supported (this may change soon).
- RosBE needs to be configured to use msvc to compile a 64 bit version of ReactOS.
You are advised to have a different compiled directory folder from the 32 bit, to separate the different codes.
The compile instructions are the same as for the 32 bit above. All that you have to do, is to change to 64 bit mode with the command charch amd64 like so:
E:\ReactOS_Development\compiled64>charch amd64
To change back to the 32 bit mode, use the same command charch, with i386 in place of amd64 and do not forget to change to your 32 bit directory folder.
Screenshots
Getting the source with Git

[1] Right click on the source folder and select Git Clone.. in the drop down menu.

The following window will then open.

[2] If the URL is correct (https://github.com/reactos/reactos.git) and the Directory (for the source) is correct, then the rest can be left as they are. Click on the OK button to start the download process.


[3a] This shows the beginning of the download process.

[3b] This shows Git downloading the files.


[4] This is shows a source download completed.

Updating a local source tree with Git

Right click on your source folder, then select TortoiseGit, then Pull...
- Fetch.png
Fetch
- Rebase.png
Rebase

If this window has the same settings as in the above, then leave it as it is and click OK

This shows a completed update of the source folder from reactos.git


Configuring and installing RosBE

[5] Choosing the installation folder for RosBE.

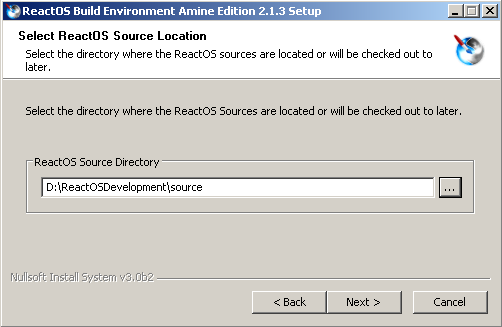
[6] Choosing the folder where the source code is to be found.


[7] Choosing a Desktop icon.

Note: If you select AMD64 compiler and Desktop shortcuts, you will have two RosBE shortcuts on the desktop, one for the 32 bit compiler and one for the AMD64 compiler.
Compiling with RosBE

[8] RosBE in action.

In the screenshot of RosBE, you can see that the working directory has been changed from source to compiled, then configure ninja has been executed and completed. The command line now shows ninja bootcd waiting to be executed.
Note: RosBE 2.2.0 amd64 displays with blue text and the for 32 bit compile mode, with green text, as above.
Changing modes in RosBE

Note: If you change from 32 bit compile mode to amd64, it will still have green text.
Section two - Unix
The ReactOS Build Environment requires the following software to be installed on Unix systems:
- as
- bison
- curl
- flex
- gcc
- git
- g++
- make
- makeinfo
- pkg-config
- python
- zlib
There is a script in the unix section of Miscellaneous, which can automate the checking for and the installation of the above software.
Setting up a local working environment
You will now need to download the current ReactOS Build Environment (RosBE), from https://www.reactos.org/wiki/ReactOS_Build_Environment
Example:
Unpack the RosBE installation files to /home/RosBE-Unix-*.*.* directory.
(*.*.* = version number, currently 2.2.1)
Create the following folders /home/RosBuild then /home/RosBuild/RosBE (install RosBE in this folder).
Note: The default directory for RosBE, is /usr/local/RosBE, if you prefer, you can use that.
To continue with my example; Open the folder /home/RosBE-Unix-*.*.* and right click within [9], for the menu, Window - Terminal Here [10].
In the terminal window, run the builder script by typing ./RosBE-Builder.sh. If it reports any missing tools [11], you will need to install them (see list above).
Then run the script as before, and if it reports all tools OK [12], then you can continue.
To follow my example, type /home/RosBuild/RosBE for the install directory and then follow the instructions from the running script.
If all went well, then it will ask you about creating a shortcut, just follow the instructions.
I created the shortcut in /home then copied it onto the desktop and checked to see if it ran RosBE.
To populate your source folder, you will need to open a terminal window within the empty source folder; right click - Window - Terminal Here, then at the command prompt, type:
git clone https://github.com/reactos/reactos.git.
This will create a folder called reactos and download the main source code.
To get the revision number, right click on the reactos folder and select Window - Terminal Here, then at the command prompt, type: git describe, which will display something like this 0.4.7-dev-532-g3cd76b91b5.
The alternative to the 'Right click-Window-Terminal Here' method, is to type the full address, eg. /home/RosBuild/source.
To update the source code, right click within the reactos folder and select Window - Terminal Here, then at the command prompt type:
git pull https://github.com/reactos/reactos.git
NOTE: You must be actually in the source folder to clone and actually in the reactos folder to update the source or get the revision number.
There is also a script in the Miscellaneous unix section, that can automate the setting up of a working environment.
Compiling the source
Start RosBE and at the terminal command prompt type cd /home/RosBuild/compiled (or the directory that you want ReactOS to be built into).
Then type /home/RosBuild/source/reactos/configure.sh.
When the script finishes, type cd /home/RosBuild/compiled/reactos/
and then ninja livecd or ninja bootcd
If you are doing something different to the suggested example above and have not created a separate directory for the compiled source, then when using RosBE, you are in the reactos directory and type configure.sh, you will find that RosBE has created a new directory in the reactos directory, called output-MinGW-i386. You must change directories into this output-MinGW-i386 directory to issue the commands ninja livecd or ninja bootcd (make does not work in Unix RosBE). The created ISO will then be in the output-MinGW-i386 directory.
What ever directory structure you have created, you will need to be in the directory that RosBE declares after it has run the command configure.sh from within the reactos directory.
This is one example (below) from RosBE output, where I have underlined the path in green. Whatever the path that is shown there, is the directory that you should be in, to build and make the ISO of your choice.
-- Configuring done
-- Generating done
-- Build files have been written to: /home/oldman/ROSBuild/Compiled32
Configure script complete! Execute appropriate build commands (ex: ninja, make, nmake, etc...).
Screenshots

[9] Move your mouse pointer into the window and right button click.


[10] Select as shown for a terminal window.


[11] RosBE installation script (RosBE-Builder.sh) running in a terminal window, showing missing dependencies.


[12] RosBE installation script (RosBE-Builder.sh) running in a terminal window, showing dependencies all found.

Section three - General
Getting the source of a single branch
You may decide you want to download the source of one of the branches, so this is how to do it from the command prompt using the directory structure from the previous examples.
In a terminal widow, navigate to your local source directory and type the following:
git clone --single-branch --branch releases/0.4.13 https://github.com/reactos/reactos.git 0.4.13
Replace releases/0.4.13 with the branch of your choice.
Explanation:
git ..................................................................... Starts git.
clone ............................................................... The command that tells git to clone the Repository.
--single-branch .............................................. This tells git to only clone a single branch.
--branch .......................................................... The switch for a branch.
releases/0.4.13 .............................................. The branch path and name.
https://github.com/reactos/reactos.git ....... The URL of the Reactos git repository.
0.4.13 ............................................................... The folder to clone into.
If you omit to put a folder name after the URL, it will use the default from github, which will be reactos. You could use any name you choose, as in the following example, where mybranch is used; if the folder does not exist, then it will be created.
git clone --single-branch --branch releases/0.4.13 https://github.com/reactos/reactos.git mybranch
Selecting a branch

In your browser, go to https://github.com/reactos/reactos, which will display the page shown in the image above.
To select a branch, click on the down arrow (as shown in the above image), then choose a branch from the drop-down list; you may need to scroll down the list.
Getting the source of a repository
If you want to clone a repository from https://github.com/reactos such as rapps-db for example, then add the repository name to the end of the url, like so:
git clone https://github.com/reactos/rapps-db
or developer-web-interface, then it would look like this:
git clone https://github.com/reactos/developer-web-interface
Using the example of rapps-db, if you wanted to clone it into another directory other than rapps-db, then you would leave a space at the end of the url and then type the chosen name for the directory, like so:
git clone https://github.com/reactos/rapps-db software_database (software_database is only a suggestion, use your own name).
See also:
